vCenter 5.5 Windows Server to vCenter 6.5 Server Appliance Migration - Stage 1
Here we are about to start Stage 1 of the migration. We have checked our hardware can take the new versions, made sure everything is backed up and safe in case we have to revert back to a previous state. We also have the relevant ISO's downloaded and ready with license keys for the new versions, lets make a start!
On the vCenter Server
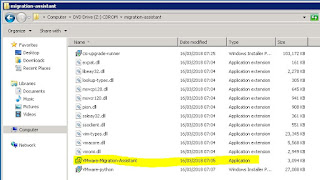
Go to the ISO file which has been mounted and navigate to the “migration-assistant” folder and in there run the “VMware-Migration-Assistant.exe” by right clicking and run as administrator.
This will launch a window like the below and prompt for your SSO password. It will then run some migration prechecks and once complete will leave you at the prompt “Waiting for migration to start”. We can now move over to your workstation PC/Laptop to continue.

Pre-check fail – OK I’m going to give you all the details even if things don’t go to plan so the first time I run the Migration assistant I received a warning stating it did not have enough free space to start the migration. The C drive on the vCenter server only had 14GB free but the migration assistant required nearly 38GB so I had to increase this before running the migration assistant again. I deleted the snapshot, added an additional 50GB to the C drive and extended this in Windows. Then took a snapshot of the VM again before starting the migration again.
On your workstation PC/Laptop


Starting the Migration
Presuming you have already downloaded the 6.5 SA ISO from VMware mount this on both the vCenter Server and your desktop/laptop workstation as you will use both to complete the migration.On the vCenter Server
Go to the ISO file which has been mounted and navigate to the “migration-assistant” folder and in there run the “VMware-Migration-Assistant.exe” by right clicking and run as administrator.

This will launch a window like the below and prompt for your SSO password. It will then run some migration prechecks and once complete will leave you at the prompt “Waiting for migration to start”. We can now move over to your workstation PC/Laptop to continue.

Pre-check fail – OK I’m going to give you all the details even if things don’t go to plan so the first time I run the Migration assistant I received a warning stating it did not have enough free space to start the migration. The C drive on the vCenter server only had 14GB free but the migration assistant required nearly 38GB so I had to increase this before running the migration assistant again. I deleted the snapshot, added an additional 50GB to the C drive and extended this in Windows. Then took a snapshot of the VM again before starting the migration again.
On your workstation PC/Laptop
Go to the mounted ISO file and navigate to the vcsa-ui-installer folder and then the win32 folder inside. Once there you will see an application called installer.exe and right click and run as administrator.

Once that has been run you will see the following screen, as we want to migrate from an existing 5.5 installation to the VSCA 6.5 we will choose the Migrate Option.

We now get an Intro to read which tells us what will happen, once read click Next to being

Now read and accept the EULA then click next

Next enter in your current vCenter server FQDN and SSO password, we are warned here to make sure we are running this migration installer from a separate workstation as the orginal VC VM will be powered off as part of the process.

Verify the SSL certificate, we are using a self signed cert so receive this warning

Next choose an ESXi host or vCenter Server instance on which the appliance will be deployed. I’ve chose one of our ESXi hosts.

Again give the OK on the self signed cert if using one.
Next enter in a name for the VM (I’m using the same one as before which is why I renamed the previous VC server _OLD) Enter a root password for the VM

Next choose the deployment type for the VM. I only have 3 hosts so the “Tiny” deployment size will suffice. I could only choose between Large and X Large for the storage.

Next choose which datastore you want this VM to reside in, I’m placing mine on one of the better performance datastores on our SAN. Do not enable thin disk mode unless in a lab.

Next choose a temporary network to allocate to the VM whilst migration takes place. Once complete the appliance will take on the network identity of the source server.
It must use a temporary IP obviously as 2 servers/devices cannot have the same IP address at the same time.
Ping the temp IP you want to use to make sure it’s not in use by something else. Then fill out your details.

Once that is done we now receive a summary for the stage 1 of the deployment, check everything is correct then select finish.

Deployment now starts..

Once complete you will see the following screen.

This process too just under 25 minutes to complete in my environment. Just in case anyone else is doing a migration to give a rough estimate. Our environment is fairly small with 3 hosts and 1 vCenter VM will all roles installed on it. Sometimes when sitting staring at a progress bar not moving can make you nervous and think something is not quite working especially when migrating a production system. But have a little patience and all should be well.
To make sure the blog posts are not too long please check out my next post for the process I followed for Stage 2!
Comments
Post a Comment